Author: Freddie Simmons Page 2 of 10

Path of Exile:Balance of Terror Explained

The Balance of Terror is a highly flexible unique Cobalt Jewel in Path of Exile, prized most by builds that rely heavily on curses. While its guaranteed elemental resistance roll is modest, the jewel true value lies in the powerful and unpredictable curse-based modifiers it can roll. With the right combination of affixes, Balance of Terror can dramatically reshape how a build functions, making top-tier versions some of the most valuable jewels among Path of Exile items.Use MMOexp to purchase instant POE currency to enhance your gaming experience.

Balance of Terror always comes with a fixed and a random component:

(10–15)% increased Elemental Resistances

Two randomly selected curse-related modifiers

These two modifiers are drawn from a pool of 18 possible effects, all of which interact with curses in different ways. Because only two appear on any given jewel, each drop can vary wildly in power and usefulness. Certain combinations are extremely rare and highly sought after, often commanding prices of several Divine Orbs or more.

How to Obtain Balance of Terror

Balance of Terror is not part of the global drop pool, nor can it be obtained through chance orbs. There is only one reliable way to farm it.

Defeating Lycia in the Forbidden Sanctum

The jewel exclusively drops from Lycia, Herald of the Scourge, but only under very specific conditions:

Lycia must be fought on the fourth floor of the Forbidden Sanctum

The encounter must be the final boss of a complete Sanctum run

You must begin the run using the unique Relic The Blood of Innocence

When these conditions are met, Lycia will guarantee a drop of Balance of Terror. There is also a chance for additional unique Relics to drop during the same fight.

Any Forbidden Tome Works

The level of the Forbidden Tome does not affect the drop. Many players intentionally use low-level Tomes because:

Enemies are significantly weaker

Floors are faster and safer to clear

Farming runs take much less time

This makes repeated jewel farming both efficient and consistent.

Players often confuse this boss with Nightmare of Lycia, found in the Sanctuary Tier 17 map. This version of Lycia has a completely separate loot table and cannot drop Balance of Terror, regardless of difficulty or modifiers.

Buying Balance of Terror Instead

For players who prefer to skip the Sanctum entirely, the trade market is a viable alternative. Prices depend heavily on the modifiers rolled:

Unpopular or weak rolls may cost only a few Chaos Orbs

Highly synergistic or “perfect” combinations can exceed 50 Divine Orbs

Because of this randomness, many players purchase or farm multiple copies while searching for the ideal roll.

Balance of Terror Modifier Overview

Although there are 18 possible modifiers in total, each jewel only rolls two. These effects generally fall into three broad categories:

Offensive Effects

Increased damage against enemies affected by specific curses

Cast speed or attack speed bonuses after applying a curse

Critical bonuses versus cursed enemies

Defensive Effects

Reduced elemental damage taken after being cursed

Damage mitigation tied to cursing enemies with Temporal Chains or Enfeeble

Utility and Status Effects

Immunity to ailments such as Ignite, Chill, or Shock when using certain curses

Movement speed or action speed bonuses triggered by curse application

Since rolls are entirely random, farming or trading multiple jewels is often necessary to find the best pairing for a given build.

Using Balance of Terror Effectively

Balance of Terror can be socketed into any regular jewel slot on the passive tree and does not require special positioning or keystones.

Aligning Mods With Your Build

The jewel shines brightest when its modifiers align perfectly with your curse setup:

Curse-on-Hit builds (such as Occultists or elemental bow builds) benefit from offensive trigger effects

Hexblast or self-curse builds gain immense value from bonuses that activate when applying or receiving curses

Support characters and aura bots can leverage defensive curse-based effects to boost survivability

You may equip multiple Balance of Terror jewels as long as they do not share the same modifier names, since identical mods do not stack. Endgame characters often use two or more to cover different curse interactions.Unleash your potential in Path of Exile. Get your buy POE currency at MMOexp today!

While the elemental resistance roll is not the jewel main selling point, it still helps with:

Managing resistance-reducing map modifiers

Offsetting penalties from certain unique items

Smoothing out gearing during early or transitional stages

Balance of Terror stands out as one of the most creative and build-defining jewels in Path of Exile. Its deep synergy with curse mechanics, wide modifier pool, and guaranteed drop method make it both a rewarding farm and a powerful optimization tool. For players willing to master the Forbidden Sanctum—or invest in the trade market—it offers enormous potential to push curse-based builds to their limits.

Black Ops 7 Zombies Ashes of the Damned – How to Unlock the Ray Gun Mk2 for Free

Ashes of the Damned is one of the largest and most mechanically dense Zombies maps Treyarch has ever released for Call of Duty: Black Ops 7. Packed with verticality, branching routes, and a complex Jump Pad network, the map can feel overwhelming at first. Fortunately, one of the most iconic Wonder Weapons in Zombies history-the Ray Gun Mk2-can be unlocked completely free through a repeatable Easter Egg.

This guide walks you through every step of the Ashes of the Damned Free Ray Gun Mk2 Easter Egg, including how the Jump Pad puzzle works, how to read the blinking light sequence, and how to guarantee consistent success every match.

How to Get the Free Ray Gun Mk2 in Ashes of the Damned (BO7 Zombies)

This Easter Egg is centered around Ashes of the Damned’s interconnected Jump Pad system and a randomized flashing light code. While it may seem complicated at first, once you understand the logic, you’ll be able to complete it quickly-even more efficiently if you’re practicing routes or farming XP in CoD Black Ops 7 Bot Lobbies.

Step 1 – Turn On the Power and Unlock the Map

Before starting the Easter Egg, you must complete the basic setup:

·Turn on the main power

·Unlock all major map areas connected by Jump Pads

·Have at least 4,000 Essence

Once the map is fully open, the Jump Pad puzzle becomes available.

Step 2 – Complete a Full Jump Pad Loop

There are eight Jump Pads on Ashes of the Damned. Your first objective is to use all eight Jump Pads in a single continuous loop, starting and ending at the same location.

Important notes:

·Your starting Jump Pad does not matter

·The order does not matter for this first loop

·Each Jump Pad costs 500 Essence (4,000 total)

Example Jump Pad Loop

·Blackwater Lake

·Ashwood

·Exit 115

·Zarya Cosmodrome

·Ashwood

·Vandorn Farm

·Janus Towers Plaza

·Back to Blackwater Lake

As long as all eight are used in one cycle, the step will register as complete.

Step 3 – Survive Four Rounds

After completing the initial Jump Pad loop, simply survive four full rounds. There is nothing to activate or interact with during this time. Once the fourth round ends, the next step becomes available.

Step 4 – Read the Blinking Light Sequence

Travel to Janus Towers Plaza and look toward the north-facing lights in the main lobby. The leftmost light will begin flashing in a randomized sequence.

Here’s how it works:

1. Count the number of flashes

2. Wait for the pause

3. Count the next set of flashes

4. Continue until the light stays solid

The sequence ranges from 1 to 7 flashes per number and will loop if you miss it.

Example Sequence

3 → 6 → 5 → 7 → 4 → 1 → 2

Each number corresponds to a specific Jump Pad location.

Step 5 – Match Numbers to Jump Pads

Use the table below to translate your blinking sequence into a Jump Pad order:

·1 – Janus Towers Plaza

·2 – Vandorn Farm

·3 – Ashwood (Market Square → Exit 115 / Zarya)

·4 – Blackwater Lake

·5 – Exit 115

·6 – Zarya Cosmodrome

·7 – Ashwood (Rabbit Alley → Vandorn Farm / Blackwater Lake)

Using the example sequence (3, 6, 5, 7, 4, 1, 2), the correct Jump Pad path would be:

·Ashwood (Market Square)

·Zarya Cosmodrome

·Exit 115

·Ashwood (Rabbit Alley)

·Blackwater Lake

·Janus Towers Plaza

·Vandorn Farm

Important: You must follow the sequence exactly. Using a Jump Pad out of order will fail the Easter Egg and force a restart in a new match.

Step 6 – Enter the Purple Portal

After completing your assigned Jump Pad sequence, take one final Jump Pad back to Ashwood from your current location. This completes the loop.

Now, look up.

A purple portal will appear floating between two Jump Pad routes. Its location is random each match, such as:

·Vandorn Farm → Janus Towers

·Janus Towers → Ashwood

·Ashwood → Blackwater Lake

Use the correct Jump Pad to launch yourself directly into the portal. If successful, you’ll be teleported instantly to Ashwood.

Step 7 – Claim the Free Ray Gun Mk2

Upon landing in Ashwood, a rift opens and releases:

·Dead zombie bodies

·Essence piles

·Bonus Points

·Possible Mystery Perks

And most importantly:

·A free Ray Gun Mk2

While the Ray Gun Mk2 can appear before Round 15, players report far more consistent results after Round 15. If you want guaranteed reliability-especially when practicing routes or buying Call of Duty Black Ops 7 Bot Lobbies-it’s best to wait.

Final Tips and Warnings

·Never use a Jump Pad out of order.

·The initial 8-pad loop only needs to be done once per match.

·The blinking sequence is randomized every game.

·The Ray Gun Mk2 Easter Egg is repeatable every match.

·Works in co-op, but all players must follow the sequence correctly.

Final Thoughts

Unlocking the free Ray Gun Mk2 in Ashes of the Damned is one of the most rewarding and repeatable Easter Eggs in Black Ops 7 Zombies. Once mastered, it takes only a few minutes to complete and gives you one of the strongest Wonder Weapons in the game-dramatically improving survivability from mid-game into ultra-high rounds.

Path of Exile 2 Version 0.3-Storm Wave Invoker Build Explained

The Storm Wave Invoker build in Path of Exile 2 (version 0.3) is a lightning-infused melee archetype that merges explosive elemental bursts with strong defensive control. As a Monk taking the Invoker Ascendancy, you’ll master the Quarterstaff to channel searing arcs of electricity while maintaining exceptional durability. This build performs excellently throughout the campaign and scales impressively into endgame-but it demands sharp timing and awareness. Mastering your buffs, Power Charges, and cooldowns is key to unleashing its true potential.

Lightning damage stands out as one of the most dominant archetypes in Path of Exile 2. The main reason lies in the Shock ailment-afflicted enemies take up to 30% more damage, making it an incredibly potent multiplier for your DPS scaling.Unlock endless possibilities with the power of POE 2 Currency purchased with MMOexp!

Core Mechanics & Skills

The Storm Wave Invoker offense revolves around three primary abilities that create a fluid, electrifying combat loop:

Storm Wave-A melee fissure attack that shocks enemies along a jagged lightning path.

Charged Staff-Grants added Lightning Damage and boosts your melee attacks when Power Charges are consumed.

Herald of Thunder-Calls down bolts of lightning on nearby enemies when you slay a shocked foe with a non-Herald skill.

Together, these form a devastating rotation where every swing, strike, and shock creates chain reactions of lightning destruction across entire packs.

Early Campaign Setup (Levels 1–21)

Since Storm Wave unlocks at Level 22, your early game will rely on cold-based leveling skills. Fortunately, the Monk offers excellent early options that synergize with Quarterstaves-your main weapon of choice.

Recommended Weapon:

Quarterstaff-Aim for one with +Skill Gem Level modifiers.

Unique Option: Pillar of the Caged God (excellent early scaling if you can purchase one early with your first Exalted Orb).

Suggested Early Gem Links:

Glacial Cascade: Rapid Attacks-Cold Attunement

Frost Bomb: Potent Exposure

Tempest Bell: Overabundance-Rage

Herald of Ice: Magnified Area-Cold Attunement

Ice Strike: Rapid Attacks-Cold Attunement

Use Glacial Cascade to freeze mobs, Frost Bomb to detonate them, and Tempest Bell for elites or bosses. This cold-based toolkit will comfortably carry you until Storm Wave becomes available.

Transition to Storm Wave (Level 22+)

At level 22, acquire Storm Wave (via Uncut Skill Gem 7) and fully respec your cold gems into lightning-oriented support gems. This is where the true identity of the build shines.

Mid-Game Gem Links:

Storm Wave: Rapid Attacks-Elemental Armament-Rage-Branching Fissures

Tempest Bell: Overabundance-Close Combat-Elemental Armament

Tempest Flurry: Rapid Attacks-Elemental Armament-Close Combat-Freeze

Herald of Thunder: Elemental Armament-Elemental Focus-Deadly Herald

Charged Staff: Prolonged Duration-Innervate-Elemental Armament

Profane Ritual: Rapid Casting-Compressed Duration-Unleash

Combat Flow

For Clearing Packs:

Open with Storm Wave to shock and obliterate mobs while generating corpses.

Use Profane Ritual to consume those corpses and gain Power Charges.

Activate Charged Staff to supercharge your melee strikes.

For Boss Fights:

Build momentum with Tempest Flurry combos.

Activate Charged Staff and unleash Tempest Bell for devastating single-target bursts.

This build rewards rhythm and precision. Keeping your Herald buffs and Power Charges active ensures constant uptime and explosive bursts of lightning damage.

Gear & Stat Priorities

Defensive Focus (Campaign):

Stack Life, Armor, and Energy Shield.

Ensure capped Resistances and increased Maximum Life for endgame survivability.

Offensive Priorities (Quarterstaff):

Increased % Physical Damage

Added Flat Lightning or Elemental Damage

+Levels to Melee Skill Gems

Increased Attack Speed

Acquiring well-rolled items early-via crafting or trade-can make progression significantly smoother. Investing in POE2 Currency for sale helps you obtain high-value gear such as lightning-based amulets or rare Quarterstaves that align perfectly with your scaling path.

The Storm Wave Invoker in Path of Exile 2 (Patch 0.3) delivers a fast-paced, visually electrifying melee experience. It’s a perfect choice for players who crave high-tempo combat, lightning-themed aesthetics, and skill-based buff management. While not the most beginner-friendly build due to its resource juggling, those who master its flow will find it both rewarding and immensely powerful in both the campaign and the endgame.

Path of Exile 2: Best Ways to Make Currency with Gwennen, Rog, and TujenIn

Path of Exile 2, the Expedition mechanic remains one of the most profitable and flexible systems for crafting and gold-making. While the core Expedition structure hasn’t changed much in Patch 0.3, the introduction of updated Essences and Desecrated Currency has reshaped its value proposition. Instead of focusing purely on high-tier rare item crafting, the Expedition system now shines as a hybrid tool for profit generation, selective crafting, and item optimization.

This guide breaks down the modern Expedition system, offering key insights into NPC functions, crafting strategies, and how to maximize your profit margins through smart use of Expedition currency and supporting mechanics.

Expedition Overview

Although the fundamental system remains unchanged, Expedition crafting in Patch 0.3 has gained more strategic depth thanks to synergy with Essences and Desecrated Currency.

Previously, Expedition was best known for crafting high-end rares using Rog’s enhancement chains. Now, it’s just as effective for gold-making, especially through the purchase and resale of weapons and bases from Gwennen. Players can also buy Gwennen Currency or Exotic Coinage to acquire rare items, then flip them for profit.

Expedition’s flexibility makes it ideal for both early-game currency farming and mid- to late-game item crafting.

Understanding Magic and Rare Path of Exile 2 Items

Before diving into crafting, it’s crucial to understand how item modifiers work:

·Magic items – Up to 2 modifiers: 1 Prefix, 1 Suffix

·Rare items – Up to 6 modifiers: 3 Prefixes, 3 Suffixes

These modifiers are independent, and Expedition crafting allows players to selectively manipulate them. Recognizing when to upgrade a Magic item to Rare-or when to preserve strong individual mods-is central to maximizing crafting efficiency.

Smart players also use Magic items as Essence bases, leveraging deterministic mods from Essences before transitioning into full Rare crafting.

Expedition NPCs and Crafting Options

Expedition revolves around four NPCs, each offering unique item interactions:

1. Dannig – Manages currency exchanges between other NPCs.

2. Gwennen – Focuses on weapons, offering the most profitable crafts.

3. Tujen – Specializes in jewelry, ideal for Amulets, Rings, and Belts.

4. Rog – Enhances armor, providing incremental crafting upgrades.

Each NPC provides a randomized set of actions. Players can:

·Add a single Prefix or Suffix

·Upgrade a Magic item to Rare

·Fill all empty Prefixes or Suffixes

·Reroll Prefixes or Suffixes

·Adjust modifier values (similar to Divine Orbs)

·Remove the weakest modifier

·Remove all Prefixes or Suffixes

However, skipping a crafting step locks you out of skipping the next, requiring careful planning.

General Expedition Crafting Tips

1. Don’t overcommit: If an item doesn’t show potential after several rolls, sell or vendor it instead of wasting materials.

2. Preserve strong mods: When a Prefix or Suffix is excellent, focus on complementing it rather than rerolling everything.

3. Magic item bases matter: Magic items with one or two powerful mods can serve as Essence crafting bases before turning Rare.

4. Improve presentation: Use Quality upgrades, Sockets, or Vaal Orbs to enhance final item value before listing for sale.

These steps ensure you’re not wasting Path of Exile 2 Currency and can consistently profit from crafting sessions.

Gwennen – Weapon Crafting

Gwennen remains the MVP of Expedition in Patch 0.3. Her weapon crafts-especially bows, staves, and two-handed maces-dominate the meta due to their high resale potential.

Weapon Tips:

·Bows: Focus on high %Physical Damage, flat Physical Damage, and Accuracy.

·Quarterstaves, Spears, and 2H Maces: Target %Physical Damage and high base Quality for endgame builds.

·Wands & Staves: Prioritize +Levels to Skills (Wands: +4+, Staves: +5+).

·Scepters: Seek +Minion Skills or high Spirit stats-ideal for caster builds.

·Quivers: Craft only those with +Projectile Skill levels, as these are in high demand.

Buying Path of Exile 2 Items or bases from Gwennen using Exotic Coinage can yield significant returns when combined with Essence crafting or targeted rerolling.

Tujen – Jewelry Crafting

Tujen specializes in crafting Amulets, Rings, and Belts, each of which can provide strong stat foundations or utility bonuses.

Jewelry Tips:

·Amulets: Prioritize +Levels, Attributes, and high base values. Non-elemental varieties (Crimson, Lunar, Azure) tend to yield better crafting outcomes.

·Rings: Choose good implicit bases (Life, Resists, Mana). Magic Rings with two solid modifiers can be expanded with Essences or Exalted Orbs.

·Belts: Focus on Life, Mana, Attributes, and Resists. High-quality Magic belts are excellent candidates for Desecrated Currency upgrades.

While Tujen’s investment cost is slightly higher, well-crafted jewelry remains highly liquid on the trade market, especially if you buy POE2 Currency in bulk to fund repeated crafting attempts.

Rog – Armor Crafting

Rog deals primarily with armor pieces, including chests, helmets, boots, gloves, and shields. His crafting potential depends on your build’s defense type.

Armor Tips:

·Evasion or Hybrid (Evasion + ES): Prioritize Life, Resists, and Dexterity-based stats.

·Energy Shield armor: Seek out high-ES bases, targeting both %ES and flat ES mods.

·Armor Shields: Focus on high Armor, Life, Block, and Strength-based stats.

Rog crafting can produce solid defensive gear for personal use, though its profit margins are lower than Gwennen’s weapon crafts.

Profitability Breakdown

Based on community data and patch testing:

·Gwennen: Highest profit per investment. Bows and two-handers regularly sell for multiple Divines.

·Rog: Mid-tier profitability, better for personal gear or niche resists-based crafting.

·Tujen: High-end jewelry crafts require heavier currency investment but yield great long-term profit.

Combining Expedition crafts with Desecrated Currency boosts modifier tiers and ensures better resale consistency.

When to Use Exalted Orbs

Exalted Orbs are best reserved for finishing touches on strong items. Use them when:

·The item already has 1-2 strong Physical mods with open Prefixes.

·ES armor has perfect base rolls and needs final affixes.

·Jewelry already includes Life, Mana, and Resistances with space for an Attribute mod.

Since the price of buying POE 2 Exalted Orbs has dropped compared to Divine Orbs, stocking up on Exalts for crafting sessions is more cost-effective than ever.

Conclusion

Expedition crafting in Path of Exile 2 represents the perfect blend of strategic item optimization and gold-making. By combining Expedition currencies, Essences, and Desecrated Currency, players can consistently generate profit while improving their gear.

Focus on Gwennen for high-value weapon crafts, Tujen for long-term jewelry investments, and Rog for durable armor options. Always preserve strong modifiers, avoid overcommitting to bad rolls, and capitalize on market trends to sell your crafted items efficiently.

Whether you’re crafting to sell or improving your personal loadout, Expedition remains one of the best currency-generating systems in Path of Exile 2-and one of the most enjoyable ways to play the economy.

New World: Season 10 Teased in ‘The Chronicle of Nighthaven’

New World, the MMO by Amazon Game Studios, has captivated players with its immersive world of Aeternum, where adventurers explore vast landscapes, battle mythical creatures, and uncover the mysteries of a cursed island. Each season has built upon this rich tapestry of lore, with new content, gameplay features, and narrative arcs that continue to evolve the game’s story. With the release of the latest lore entry, “The Chronicle of Nighthaven,” New World has set the stage for its highly anticipated Season 10, deepening the narrative and raising the stakes for the island’s inhabitants.

In this article, we will explore what The Chronicle of Nighthaven reveals about Aeternum’s history, what it means for the upcoming season, and how it enriches the world of New World for players both old and new. Understanding this article will help you get New World Gold and other rewards faster in the game.

Aeternum’s Dark Legacy: The Chronicle of Nighthaven

Season 10’s build-up hinges on the introduction of a new chapter in the island’s history with “The Chronicle of Nighthaven.” This narrative entry paints a picture of Aeternum’s past, highlighting an era long before the current age of strife. It introduces the region known as Nighthaven, a once-vibrant settlement now steeped in shadows, which plays a central role in the lore that Season 10 will explore.

Nighthaven’s Rise and Fall

Nighthaven was founded centuries ago during the height of the Nightsworn Dynasty, a civilization that sought to control the power of the Corrupted, the dark forces that have plagued Aeternum since the island’s early days. The Nightsworn were not content with simply coexisting with the Corrupted, unlike other factions on Aeternum. Instead, they sought to harness and even dominate the Corrupted through arcane rituals, hoping to gain immortality and infinite power.

The Chronicle paints a vivid picture of the Nightsworn Dynasty’s early successes. The once-beautiful city of Nighthaven, built in an ancient valley surrounded by towering mountains, became the centerpiece of their grand ambitions. Utilizing the mysterious Aether-the volatile substance that powers much of Aeternum’s strange phenomena-they constructed powerful devices and summoned dark entities, all in an attempt to bind the Corrupted to their will.

However, their hubris proved to be their undoing. The more the Nightsworn pushed the boundaries of magic, the more their city began to unravel. The Aether, unstable and dangerous, began to leak and contaminate everything it touched. The Corrupted, initially subdued, began to break free, and their influence spread like wildfire. As the Aether-driven technologies turned against them, Nighthaven fell into ruin.

The survivors of the Nightsworn Dynasty fled, leaving behind a forsaken city now teeming with powerful Corrupted creatures and the twisted remnants of their own dark magic. The fall of Nighthaven has been a ghost story whispered among the survivors and travelers on Aeternum, but now, thanks to The Chronicle of Nighthaven, its true legacy is coming to light.

The Chronicle’s Impact on Season 10

The release of The Chronicle of Nighthaven is not just a simple addition to the lore but a catalyst for the upcoming changes and content in Season 10. Here’s what players can expect as the new season unfolds:

New Zones and Enemies: The Return to Nighthaven

In Season 10, players will finally have the chance to visit Nighthaven, the ruined city that serves as a direct link to the ancient history of Aeternum. This once-glorious settlement will now be a new PvE area, filled with Corrupted enemies, dark magic, and hidden treasures left behind by the Nightsworn Dynasty. Players will need to navigate its treacherous landscape, exploring crumbling streets and eerie temples to uncover the secrets of the past.

The zone promises a mix of environmental storytelling, quests, and boss battles that tie directly into the fallout from the Nightsworn’s failed experiments. Expect encounters with enemies that reflect the twisted nature of the Aether, such as Aetherbound monsters, once-human soldiers turned into grotesque entities by the Corrupted forces. These new enemies will provide both thematic depth and challenging content for players.

Additionally, Nighthaven will be home to a series of expansion quests, pushing players to delve deeper into the arcane technologies that once powered the Nightsworn civilization. These quests will explore not only the history of the city but the dangerous, unstable magic that still lingers within its ruins. For high-level players, the Nighthaven content promises some of the most challenging group content yet.

New Factional Struggles: The Awakening of the Nightsworn

As part of the lore’s unraveling, the Nightsworn faction is poised to return in Season 10. These enemies were long thought to be a shadow of the past, but the discovery of Nighthaven’s ruins has rekindled their malevolent ambitions. New faction quests will see players caught in a battle between the emerging Nightsworn forces and the island’s other factions, each seeking control over the knowledge and power hidden in the ancient city.

The return of the Nightsworn will also be tied to a new PvP event that challenges players to not only defend their settlements but also to push the corrupted forces out of key locations across Aeternum. As players face the resurrected Nightsworn, they will also come into conflict with other factions vying for control over the Aether’s dangerous power.

Nightsworn Technology: New Weapons and Crafting Materials

The Chronicle hints at the discovery of ancient Nightsworn technologies that still pulse with corrupted magic, awaiting those brave or foolish enough to wield them. These new crafting materials will allow players to craft weapons and gear with unique properties, blending both the mystical and the dangerous aspects of Aeternum’s world. Expect new weapon types-such as Aether-infused bows or Corrupted greatswords-that carry both magical and physical properties, offering a new dynamic to combat.

New crafting stations will also appear, enabling players to forge items from the wreckage of Nighthaven and its dark magics. However, using these materials will come at a cost. As the Aether is unstable, weapons forged with it may carry a risk of corruption, with random debuffs or buffs that affect gameplay, requiring players to carefully manage their gear to avoid being consumed by the very magic they seek to harness.

The Unfolding Narrative: What’s Next?

The introduction of “The Chronicle of Nighthaven” is just the beginning. Season 10 is shaping up to be one of the most lore-heavy seasons in New World’s history, adding significant depth to the island’s backstory while also pushing the narrative forward into uncharted territory. While Nighthaven’s history and the rise of the Nightsworn are front and center, players should expect even more revelations as the season progresses.

The integration of dark Aetheric forces, new factions, and mysterious technology sets the stage for even greater battles and deeper exploration into Aeternum’s most dangerous corners. Will the Nightsworn succeed in their twisted ambitions, or will players from across the island unite to stop them? Only time will tell, but the discovery of Nighthaven has undoubtedly opened a new chapter in Aeternum’s ever-expanding lore.

Conclusion: A New Dawn in Aeternum

With Season 10 fast approaching, New World’s latest lore entry, “The Chronicle of Nighthaven”, lays the foundation for an exciting new phase in the game’s narrative. The return of the Nightsworn, the haunting remnants of Nighthaven, and the dangerous forces of Aether combine to create a season brimming with new challenges, mysteries, and rewards. Get ready to buy New World Coins to help you quickly grow and adapt to the new season.

For players eager to uncover the hidden truths of Aeternum, Nighthaven will be a place of both discovery and peril, where the sins of the past threaten to rise again. Whether you’re battling through new zones, crafting powerful weapons, or engaging in intense faction wars, Season 10 promises to deliver an unforgettable adventure in the ever-evolving world of New World. Keep your wits about you-Aeternum’s darkest secrets are about to come to light.

Diablo 4 Season 10 Unique Items: Maximizing Chaos Armor Potential

A new Diablo 4 season always brings excitement, and Season 10 is no exception. With the arrival of Chaos Perks and the innovative Chaos Armor mechanic, Blizzard has introduced a fresh set of Unique Diablo 4 Items for each class. These powerful gear pieces are designed to reshape buildcrafting, offering new synergies and strategies that reward experimentation and skill.

While not every Unique in Season 10 will redefine the meta, several show immense potential for endgame viability. This guide will break down the new Uniques by class, explore their affixes, and explain how Chaos Armor enhances their utility. Additionally, we’ll highlight ways to efficiently obtain the necessary Diablo 4 Items.

Chaos Armor and Its Impact on Unique Items

Season 10’s Chaos Armor system is more than a cosmetic or marginal feature; it fundamentally changes how players approach gear slots. Traditionally, certain Uniques were locked to specific equipment slots, meaning their synergies with other high-value items were limited. With Chaos Armor:

·A Unique item can now appear in alternate slots, enabling combinations that were previously impossible.

·Builds that relied on one or two high-tier items now have the flexibility to include multiple powerful Uniques.

·Items previously considered underwhelming gain relevance because they can now coexist with other key pieces.

For players aiming to dominate endgame content, this opens vast new opportunities. By combining Chaos Armor with the right Diablo 4 Items, or strategically choosing to buy Diablo IV Items, players can achieve optimized setups without waiting for perfect RNG drops.

Sorcerer Uniques in Season 10

Sorcerers gain several noteworthy Uniques this season that emphasize hybrid elemental damage and AoE dominance:

·Frostfire Orb – Boosts Ice and Fire spell damage simultaneously; pairs exceptionally well with Chaos Armor for hybrid elemental builds.

·Scepter of Tempest – Increases Lightning Spear damage and reduces cooldown when chaining elemental spells.

These items excel when paired with Chaos Perks that enhance AoE damage or reduce cooldowns. Players farming Diablo 4 materials can prioritize rerolling affixes to match their desired hybrid build.

Necromancer Uniques

Necromancers benefit from items that amplify corpse management, summoning efficiency, and self-healing:

·Bloodveil Ring – Grants cooldown reduction for Corpse Explosion while increasing Blood Mist uptime.

·Skeletal Gauntlets – Boost Summon Skeleton damage and add a bonus scaling with equipped Chaos Armor.

Chaos Armor allows these items to coexist with Legendary armor pieces that increase survivability, creating builds that are both aggressive and nearly self-sustaining.

Barbarian Uniques

Barbarians thrive on raw damage and multi-skill rotations. Season 10 introduces:

·Sabre of Tsasgal – Boosts damage for each skill equipped, transforming hybrid Whirlwind / Mighty Throw / Hammer builds.

·Gauntlets of Reckoning – Reduces cooldowns and enhances AoE scaling for Berserkers.

Paired with Chaos Armor, these Uniques allow Barbarians to maintain high damage across both single-target bosses and large enemy waves. Players can combine farmed Diablo 4 materials with strategic Diablo 4 item acquisitions to perfect these setups.

Druid and Rogue Uniques

Druids gain access to shapeshifting and storm-centric gear, while Rogues focus on mobility and burst damage:

·Stormclaw Mantle (Druid) – Enhances Stormclaw damage and increases shapeshift duration, synergizing with Chaos Armor for multi-element hybrid builds.

·Shadowstrike Dagger (Rogue) – Boosts critical strike after teleporting or dashing, allowing rapid multi-target kills.

Both classes benefit from combining Chaos Armor with other endgame gear.

Efficient Strategies for Acquiring Season 10 Uniques

Farming

·High-level Nightmare dungeons and Escalating Nightmares remain reliable sources of Unique drops.

·Collect Diablo 4 materials alongside Uniques to allow rerolling and Masterworking, maximizing their potential.

Upgrading

·Chaos Armor combinations often require fine-tuning via Diablo 4 materials.

·Prioritize materials that boost primary damage types or enhance cooldown reduction to make Uniques more effective.

Conclusion

Season 10 of Diablo 4 is redefining buildcrafting through the synergy of Chaos Armor, Chaos Perks, and a fresh batch of Unique Diablo 4 Items. Each class has received Uniques that encourage hybrid builds, creative strategies, and higher skill expression.

For veterans and newcomers alike, the combination of new Uniques, Chaos Armor, and strategic material management makes Season 10 the ultimate playground for creativity, strategy, and progression in Diablo 4.

Diablo 4 Season 10:Complete Reveal of New Uniques

Each new Diablo season brings changes to mechanics, balance, and endgame progression—but nothing sparks player excitement quite like brand-new Uniques. These powerful Diablo 4 Items often redefine builds, shake up the meta, and inspire creative theorycrafting. Season 10 continues this tradition, giving every class at least one new Unique to explore, whether revisiting old strategies or experimenting with entirely new ones.

Currently available on the Public Test Realm (PTR), these items may be tweaked before launch—names, stats, and effects could shift slightly. Still, their core designs already hint at exciting possibilities for Season 10 theorycrafting. Notably, several appear in Chaos Armor slots, which means they aren’t locked to a single gear type, adding flexibility to endgame loadouts.Get your Diablo 4 gold from MMOexp today and dominate every battle with confidence!

Here’s a closer look at each new Unique, what it offers, and how it could reshape the evolving Diablo 4 meta.

1.Sabre of Tsasgral (Barbarian)

    Barbarians have long favored defensive setups with only one or two main damage skills. The Sabre of Tsasgral aims to change that by encouraging multi-skill rotations.

    Effect:Promotes equipping and actively cycling multiple offensive skills.

    Synergies:Whirlwind, Hammer of the Ancients, and Rend benefit most.

    Impact:Barbarians can now embrace a more dynamic, damage-focused playstyle instead of relying primarily on Shouts and defenses.

    2.Kilt of Blackwing (Druid)

      Season 10 finally brings attention to one of the Druid underused abilities:Ravens. The Kilt of Blackwing transforms these companions into central damage contributors.

      Effect:Boosts Raven damage and integrates them with shapeshifting and Companion synergies.

      Impact:Hybrid Druid builds combining shapeshifts and summoned animals become much more viable, offering exciting alternatives to traditional builds.

      3.Gospel of the Devotee (Necromancer)

        Necromancers usually focus on minions or heavy two-handed weapons, but Gospel of the Devotee shifts the spotlight to Basic Skills.

        Effect:Enhances Basic attacks and abilities, especially piercing Bone Splinters.

        Impact:Unlocks the potential for Basic Skill–focused Necromancer builds, with vulnerability stacking adding extra strategic depth. A previously niche approach could now compete in endgame content.

        4.Orphan Maker (Rogue)

          Orphan Maker introduces a new mechanic for Rogues:Reload.

          Effect:After firing, skills enter a brief downtime, but damage is amplified, and some skills may trigger twice.

          Synergies:Works well with Marksman bonuses and Vulnerable damage scaling.

          Impact:Creates a high-risk, high-reward burst playstyle that could put Rogues back in the spotlight of endgame meta.

          5.Galvanic Azurite (Sorcerer)

            Lightning builds have been overshadowed by Fire and Frost, but Galvanic Azurite could shift the tide.

            Effect:Magnetizes enemies, clustering them together while amplifying lightning damage.

            Synergies:Chain Lightning, Ball Lightning, and AoE skills thrive with this item.

            Impact:Could turn Lightning Sorcerers into top-tier AoE damage dealers while delivering visually stunning effects.

            6.Hesha e Kesungi (Spiritborn)

              Spiritborns receive their first dedicated Unique in Season 10 with Hesha e Kesungi, focused on enhancing Gorilla-based skills.

              Effect:Provides a damage boost for Gorilla skills that works on both mobs and bosses.

              Impact:Empowers crowd control and boss damage, giving Gorilla-centric builds a new edge in endgame setups.

              Season 10 promises to be one of Diablo 4 most experimental seasons yet. These Uniques don’t just increase raw power—they encourage players to revisit forgotten skills, explore new mechanics, and rethink how each class is equipped. Turn your Diablo IV journey into pure adventure—protect your buy Diablo 4 Items with MMOexp trusted service today. If they retain their PTR stats, investing in these items could open up the most diverse and innovative meta the game has seen so far.

              OSRS Giants Foundry Positioning Guide:Refining Your Smithing Flow

              For Old School RuneScape players looking to push their Smithing skill to new heights, the Giants Foundry offers a focused, rewarding path unlike any other. Introduced as a dedicated mini-game for mid-to-high-level Smithers, it transforms molten metal into XP and profit through a system that rewards timing, awareness, and strategic positioning.

              But maximizing your output at the Foundry isn’t just about having ores and blueprints-it’s about where you stand, how you move, and when you act. This guide breaks down the most effective positioning techniques and timing tactics to help you perfect your rhythm and dominate the Foundry floor.

              Located beneath the giants enclave in the city of Anvil Haven, the Foundry tasks you with creating weapons by smelting and refining alloys into molds provided by Kovac. Every step in this loop-from heating and cooling the blade to grinding or polishing-involves interacting with machines that operate on a timed efficiency cycle.

              The better your timing and positioning during these steps, the faster and more accurate your progress will be, translating directly into XP and Foundry Reputation points.

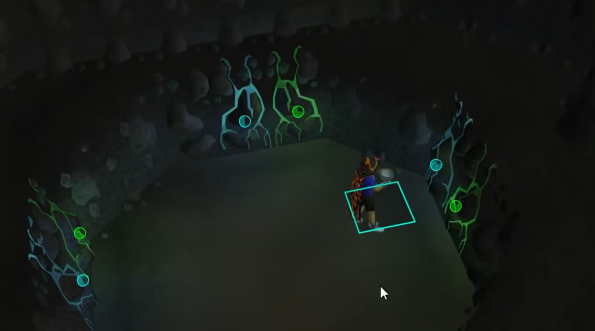
              One of the core mechanics in the Giants Foundry is the golden outline that briefly appears around a station during a refinement task (e.g., the trip hammer or the polish wheel). This glow signals a short, roughly 6-second optimal window where your input grants maximum progress per interaction-about 5% or more per click.

              Clicking outside this window wastes time, especially if you’re aiming to complete contracts as quickly as possible for higher efficiency rates.Your time is valuable—skip the hassle and buy OSRS gold from RSgoldfast now!

              Positioning Tips to Improve Reaction Time and Efficiency

              1.Hug the Stations Closely

                Wherever you’re working-whether it’s cooling, grinding, or hammering-always position your character as close to the station as possible. This reduces travel time between steps and ensures you’re ready to act the moment the golden indicator appears.

                Best Practice:Stand on the edge of the station clickable zone but stay visible so you can monitor the glow.

                2.Pre-Click Strategy

                  After initiating an action (like placing the sword on the grindstone), hover your cursor over the machine and prepare to click again as soon as the glow appears. This semi-AFK rhythm helps avoid missing the efficiency window and builds muscle memory over time.

                  Pro Tip:Use left click to interact hotkeys and avoid misclicks by turning off unnecessary UI elements.

                  3.Optimize Your Camera Angle

                    Adjust your in-game camera so that all machines are in clear view with minimal overlap from other elements. A top-down or slightly angled view often gives the clearest look at glow timings and helps you switch stations quickly.

                    Tip for low-end PCs:Lower graphics settings to ensure you don’t miss the glow due to lag or visual clutter.

                    4.Minimize Movement Between Stations

                      Before you start refining, plan your route. For example, if your blade will need heating, shaping, and cooling-try to choose a position where all three machines are within a short walking path. Less movement equals more uptime.

                      Efficiency Route Example:From the lava pool → trip hammer → water basin → grindstone-form a triangle route that flows naturally.

                      5.Avoid Unnecessary Interface Distractions

                        During refining, avoid opening your inventory or other menus unless necessary. Even small UI interruptions can distract from the golden window and reduce your output.

                        While positioning plays a huge role, other factors can make or break your refining speed:

                        Gear Buffs

                        Smiths Tunic, Gloves, and Boots:These not only look the part but give small XP boosts that stack up over time.

                        Ice Gloves:Reduce the time needed at the cooling station, cutting precious seconds from your loop.

                        Blueprint Management

                        Always tailor your blueprint to your skill level and material availability. Shorter, easier contracts are better if you’re farming XP; longer, complex ones suit those aiming for Foundry rewards like the Smiths Outfit or the Colossal Blade.

                        Resource Stockpiling

                        Make sure your inventory is prepped with the right bars before you begin. Having to pause your session to restock breaks your efficiency rhythm and adds unnecessary downtime.Boost your OSRS gaming experience with premium buy RS gold from RSgoldfast! Trust RSgoldfast for unbeatable prices and top-notch service!

                        Giants Foundry is more than just a Smithing side hustle-it’s a rhythm-based mini-game where positioning, awareness, and timing define your success. By staying close to your machines, watching for the golden glow, and reducing excess movement, you can forge faster and smarter-not harder.

                        With enough practice, you’ll find yourself entering a flow state where each blade is crafted with precision, each XP drop feels earned, and your Smithing levels rise in record time.

                        How to Acquire Cobalt in Skull and Bones

                        In Skull and Bones, gathering resources is vital for upgrading your ship and progressing through the game. Among these resources, cobalt stands out as a valuable material essential for crafting and improving your gear. This guide will help you locate cobalt, understand the gathering mini-game, and share tips to optimize your collection efforts.

                        Mastering Resource Gathering

                        Resource collection in Skull and Bones is designed to be intuitive and engaging, letting you focus on exploration and naval combat without overly complicated mechanics. Whether harvesting simple materials like acacia fibers or tougher resources such as cobalt ore, the gathering process follows the same core principles. Success hinges on your timing and attention during the mini-game that activates when collecting resources.

                        Where to Find Cobalt

                        Cobalt usually spawns near gemstone ore deposits scattered across the seas. Look out for shimmering, glittering rocks that signal these precious deposits. Your in-game map often marks these locations, making it easier to plot efficient routes. When you spot a deposit, position your ship carefully before starting the gathering sequence.

                        Step-by-Step: How to Gather Cobalt

                        Approach the Deposit

                        Sail close to the cobalt ore while keeping an eye out for enemy ships or environmental dangers that might interrupt you.

                        Initiate Gathering

                        Once in range, press the prompt button to begin gathering. This launches the mini-game where your timing skills are put to the test.Upgrade your fleet and your wealth today by purchasing Skull and Bones Items quickly and securely!

                        Understanding the Gathering Mini-Game

                        The mini-game is all about precision timing:

                        Visual Cue: An icon moves along a meter. Your goal is to tap the button when the icon hits the highlighted yellow or green zones.

                        Zones Explained:

                        Green Zone: Hit this for the highest yield of cobalt.

                        Yellow Zone: Successful, but fewer resources are gathered.

                        Mistakes Matter: Missing both zones stops the gathering process, forcing you to reposition and try again. This can be frustrating, especially in contested waters.

                        Tips to Maximize Your Cobalt Harvest

                        Practice Your Timing

                        Improve by practicing on easier resources to get a feel for the mini-game without risking valuable cobalt.

                        Stay Alert and Defend

                        Secure your ship and avoid distractions or battles while gathering to prevent costly interruptions.

                        Team Up With Others

                        Gathering in groups lets teammates protect the ship and watch for threats while you focus on mining.

                        Upgrade Your Ship

                        Faster, sturdier ships help you reach deposits quickly and escape danger more effectively.

                        Plan Efficient Routes

                        Map out a course hitting multiple cobalt sites to minimize travel downtime and maximize gathering time.

                        Collecting cobalt in Skull and Bones is both rewarding and essential for upgrading your vessel and crafting better equipment. By mastering the mini-game mechanics and following these strategic tips, you can boost your gathering efficiency and keep your supplies well-stocked.

                        Remember, the seas are unpredictable—balancing resource gathering with combat and exploration is the key to thriving in this pirate adventure. Ready your crew, sharpen your skills, and set sail for riches!

                        For those eager to enhance their inventory quickly, consider using MMOexp for premium buy Skull and Bones Silver. Now, hoist your sails and may the winds guide you to abundant cobalt and glory!

                        Mmoexp Old School RuneScape: Newest PvM Challenge: Take on the Royal Elemental Titans

                        Old School RuneScape (OSRS) continues to evolve its PvM landscape, and the latest update introduces a thrilling new boss encounter: the Royal Elemental Titans, Branda, Queen of Fire, and Eldric, King of Frost. This high-octane two-boss fight is more than a test of brute strength’s a carefully designed teaching encounter focused on improving your gear switching and PvM fundamentals. Whether you’re a seasoned veteran or an intermediate combatant looking to sharpen your skills, the Royal Titans will push your limits in a dynamic and rewarding way.

                        The Battle Begins: What to Expect

                        The Royal Titans are located in a new arena designed specifically to facilitate learning through combat. Jagex refers to this as a “teaching encounter,” building on lessons introduced in prior bosses such as Scurrius and Perilous Moons. The fight emphasizes gear switching between melee, range, and magic to counter the ever-changing threats posed by these elemental behemoths.

                        You’ll face Branda and Eldric simultaneously, each commanding their elemental forces. Branda uses powerful fire-based attacks and summons flame minions, while Eldric brings frost damage and icy summons. Their mechanics require you to adjust your positioning and combat style constantly, reinforcing the need for a reactive and adaptable PvM strategy.

                        The recommended minimum combat level is 70+, with a strong emphasis on having solid gear for all three combat styles. Efficient switching between styles is key to exploiting elemental weaknesses, defeating minions quickly, and surviving coordinated elemental barrages.

                        Combat Strategy: Gear Up for Success

                        Preparation is crucial. While melee is considered the most effective for direct boss damage, range is needed to deal with summoned enemies that attempt to keep their distance, and magic is useful for exploiting specific elemental vulnerabilities. You’ll want to bring gear that allows for smooth and efficient switching-perhaps Barrows gear, Armadyl crossbow, and standard or ancient spellbooks, depending on your setup.

                        If you need better gear or consumables like Saradomin brews, Sharks, or Prayer potions, don’t hesitate to use your OSRS gold to purchase them from the Grand Exchange or trusted vendors. Going into this fight under-equipped could be a costly mistake, especially if you’re attempting it solo.

                        One important detail is that the fight can be undertaken solo or as a duo. Solo runs are far more challenging but reward you with 100% of the loot. In duos, coordination is key- ideally, both players should master all three combat styles to stay flexible.

                        Unique Mechanics: Elemental Mayhem

                        Branda and Eldric’s abilities complement and contrast one another in ways that make the battle chaotic but manageable with practice. Firewalls may block paths, while frost zones freeze you in place. Minions can appear and deal chip damage or crowd-control you while the Titans charge up heavy-hitting spells.

                        This fight isn’t just about damage-per-second’s a dance of movement, timing, and reaction. The bosses will sometimes separate, forcing players to split up or make a quick decision about which one to prioritize. This can be an excellent teaching moment in target-switching and prioritization, skills that pay dividends in harder raids and future PvM content.

                        Loot and Rewards: Choose Wisely

                        Once both Titans fall, here comes one of the encounter’s most interesting twists-you can only loot one of the bosses. This introduces a new element of choice and risk management. Each boss drops unique items:

                        Twinflame Staff – Assembled using components from both Titans, this staff casts elemental spells automatically based on your target’s weakness, streamlining PvM rotations.

                        Giantsoul Amulet – Teleports you directly to this boss fight or other select PvM locations, saving time on travel.

                        Desiccated Pages – Likely to be tied to lore or future magic upgrades.

                        Mystic Vigour Prayer Scroll – A Branda-exclusive drop that unlocks a powerful new Prayer.

                        There’s also a new pet, hidden behind RNG, as always. In an Araxxor-style twist, you can choose to sacrifice your loot at the end of the fight to double your odds of receiving the pet. This makes each run a strategic gamble-do you go for guaranteed value or risk it all for that prestigious drop?

                        Why This Boss Matters

                        Beyond the loot, the Royal Elemental Titans serve a broader purpose: they teach players to PvM smarter. Jagex has intentionally structured the encounter to introduce players to high-level concepts in a forgiving but challenging environment. There’s no one-hit KO mechanic, no RNG overload, and no excessive grind required just to get a shot at them. It’s accessible, rewarding, and more than anything, fun.

                        Additionally, the PvM-focused rewards offer meaningful upgrades for players pursuing bossing as a main goal. The Twinflame Staff, for instance, could become a go-to weapon for boss fights with known elemental weaknesses, saving time and boosting efficiency.

                        Final Tips: Prepare Before You Dare

                        Bring a familiar with food or healing if available, or bank up high-tier consumables beforehand.

                        Use cheap OSRS gold to ensure you’re fully stocked with potions, armor, and backup weapons.

                        Practice gear switching in safe zones or other multi-style fights (like Barrows or Pest Control) if you’re not confident.

                        If soloing, consider teleport gear like the Giantsoul Amulet to cut down on travel time between attempts.

                        Whether you’re in it for the challenge, the loot, or the pet, the Royal Elemental Titans offer one of the most engaging PvM experiences OSRS has seen in recent updates. And with cross-platform play on PC, iOS, and Android, you can grind for that pet or teleport scroll anywhere home or on the go.

                        And if you’re looking to gear up fast or stockpile supplies before facing Branda and Eldric, consider securing some OSRS gold through MMOexp. With fast delivery, trusted service, and great deals, MMOexp makes it easy to get what you need and focus on what matters: dominating Gielinor’s toughest new challenge.

                        Page 2 of 10

                        Powered by WordPress & Theme by Anders Norén