

Call of Duty:Black Ops 7 Zombies – Top Weapon Loadout for Cursed Ashes

Ashes of the Damned is one of the most challenging Zombies maps in Call of Duty:Black Ops 7. Whether you’re aiming to complete the full Easter egg, survive the final boss, or push into high rounds, choosing the right loadout is crucial for success.

The M15 MOD 0 assault rifle is the standout primary weapon for this map. It’s easy to handle, scales well into later rounds, and supports a vital attachment required for the boss fight.

The M335-X Cloak Underbarrel lets you fire smoke grenades. These are critical during the boss encounter when repairing Ol’ Tessie, as they conceal you from zombies and provide space to survive explosions and heavy crowd pressure.Get ahead before it counts. MMOexp CoD Black Ops 7 Bot Lobbies help you build consistency, confidence, and skill—so you’re ready when the real matches begin.

Recommended Attachments

For maximum effectiveness, equip the following on the M15 MOD 0:

Monolith Suppressor (Muzzle):Improves bullet velocity, damage range, and grants extra salvage on kills.

16.5” Fusion Barrel:Further boosts range and bullet velocity.

M335-X Cloak (Underbarrel):Provides smoke cover for repairs.

Backline Flip Mags:Speeds up reloads for continuous fire.

Hexcut Grip:Enhances ADS, slide-to-fire, dive-to-fire, and jump ADS speeds.

Telescopic Stock:Increases movement, strafing, and hipfire mobility.

5.56 NATO Overpressured:Increases bullet velocity.

Secondary Weapon:The Necrofluid Gauntlet is essential. It delivers high damage, drains health from enemies, and trivializes most encounters outside the boss arena. During the boss fight, leave Ol’ Tessie only briefly if explosions force repositioning.

Best GobbleGums

GobbleGums aren’t required, but they significantly improve survivability and make difficult runs easier.

Recommended GobbleGums

Perkaholic:Grants all perks instantly.

Near Death Experience:Revives players nearby while keeping perks.

Power Keg:Activates a Full Power power-up.

Shields Up:Fully restores armor and doubles its durability.

Gift Card:Gives 30,000 Essence—ideal for Round 1 to open doors, early Pack-a-Punch tiers, and quickly progress Easter egg steps.

Boss Fight Strategy

Solo:Power Keg, Shields Up, Perkaholic

Co-op:Power Keg, Shields Up, Near Death Experience

Essential Perks and Augments

The following perks are critical for survival and Easter egg completion:

Jugger-Nog:Boosts health.

Quick Revive:Faster healing and revives.

Speed Cola:Increases reload speed and improves armor application.

Stamin-Up:Enhances movement speed.

Melee Macchiato:Increases melee damage.

Recommended Perk Augments

Jugger-Nog (Iron Core, Durable Plates):Extra health when armor breaks and increased armor durability.

Quick Revive (Dying Wish, Karmic Return):Grants temporary invulnerability and full heal on revive.

Tip:Dying Wish can save your run by preventing death, even if it consumes Quick Revive, keeping all other perks active.

Equipment Recommendations

Tactical:Cymbal Monkey

Unlocks at Level 24

Costs 1,000 Salvage

Carry two at once

Recharges with Max Ammo

Cymbal Monkeys are excellent for distracting zombies during repairs or surviving laser-heavy boss mechanics. While slower than the Kazimir, their recharge synergy and accessibility make them the superior choice for Ashes of the Damned.

Lethals and Scorestreaks:Generally optional. The Combat Axe is only needed for a side Easter egg at Reba’s Diner (Exit 115).

Field Upgrades

Best Choice:Aether Shroud

Aether Shroud is mandatory. When active, all enemies—including elites and bosses—ignore you completely.

Recommended Augments

Extra Charge:Grants a second Shroud charge.

Group Shroud (Co-op):Cloaks nearby allies.

Burst Dash (Solo):Short-range warp that kills standard enemies.

Extension (Extra Slot):Significantly extends Shroud duration.

Two Shroud charges during the boss fight can be the difference between success and failure.

Ashes of the Damned is punishing, but with this setup, it becomes far more manageable. This loadout prioritizes:

Survivability

Boss fight efficiency

Consistent Easter egg progression

Many players practice strategies in buy Black Ops 7 Bot Lobbies, which allow them to refine movement, weapon handling, perks, and GobbleGums without risking a full run. Some even invest in private bot lobbies to perfect setups before attempting full Easter egg runs or boss fights.

Diablo 4: Scepter of the Three Drop Locations and Farming Guide

For Diablo 4 Warlock players chasing endgame dominance, the Scepter of the Three stands as one of the most transformative unique weapons in the game. This two-handed mace redefines ultimate skill gameplay, unlocking build potential that no other Diablo 4 Items can match. However, its rarity means farming it requires strategy, patience, and a clear understanding of where and how to hunt it down.

This guide breaks down everything you need to know about the Scepter of the Three: its unique effects, primary drop locations, efficient farming methods, and tips to maximize your chances of adding this game-changing weapon to your arsenal. Whether you’re a seasoned endgame player or just entering the high-difficulty content, this guide will streamline your farming journey.

What Is the Scepter of the Three?

Before diving into farming, it’s critical to understand why the Scepter of the Three is worth the effort. As a Warlock-exclusive unique two-handed mace, it boasts three game-altering effects that completely reshape ultimate skill mechanics.

First, it grants +15 ranks to all your ultimate skills-turning a maxed-out 15/15 Apocalypse into a devastating 30/15, for example. Second, it allows you to equip multiple ultimate skills simultaneously, removing the standard restriction of only one ultimate per build. Third, attacking enemies with no active ultimate builds up your ultimate damage by 4-5% per hit, capped at 80-100%, which resets once all active ultimates end.

These effects combine to create absurd scaling potential for ultimate-focused Warlock builds, changing skill rotations, build structures, and burst damage windows entirely. It’s not just a weapon-it’s a cornerstone of endgame optimization for Warlocks prioritizing multi-ultimate synergy.

Primary Drop Locations for the Scepter of the Three

The Scepter of the Three is a rare unique item, meaning it only drops from high-level, endgame content. While it can appear in random loot pools, there are two primary locations where you can target-farm it-one reliable boss and several high-loot-density activities.

1. Andariel in Hanged Man’s Hall (Greater Lair Boss)

The most consistent source of the Scepter of the Three is Andariel, one of Diablo 4’s Greater Lair bosses located in Hanged Man’s Hall in Kehjistan. Andariel’s loot table explicitly includes the Scepter of the Three, making her the top target for players seeking this weapon.

However, farming Andariel comes with a bottleneck: Greater Lair Keys. You need these rare keys to open her boss chest and claim meaningful rewards, including the chance to get the Scepter. Without a steady supply of keys, your farming efficiency will plummet.

2. Helltide Events

Helltide events are another reliable source for the Scepter of the Three. These hourly events spawn across the map, filling the area with powerful enemies and loot-rich chests that can drop unique items.

To maximize your chances here, focus on farming Cinders-Helltide’s exclusive currency-by defeating enemies and completing event objectives. Use these Cinders to open Helltide Chests, as they have a higher chance of dropping unique items like the Scepter compared to regular chests.

3. Nightmare Dungeons and World Events

While not as target-specific as Andariel or Helltide, Nightmare Dungeons (especially those with high monster density and elite spawn rates) are excellent for farming unique items. The higher the difficulty of the Nightmare Dungeon, the better your chances of encountering rare loot drops, including the Scepter of the Three.

World events-such as Gathering Legions or World Boss fights-also offer a chance to earn the Scepter. These events reward large loot caches, and their high enemy count increases the odds of a rare drop. Make sure to participate in these events whenever they spawn to keep your farming diversified.

4. Purveyor of Curiosity Gambling

For players with extra Gold and Obols, gambling at the Purveyor of Curiosity is a viable (though less consistent) method. While the Purveyor’s loot is random, focusing on two-handed maces increases your chances of rolling the Scepter of the Three. This is best used as a secondary farming method while you pursue other primary sources.

Efficient Farming Strategies for the Scepter of the Three

Farming rare unique items in Diablo 4 is a game of consistency and efficiency. Below are proven strategies to streamline your hunt for the Scepter of the Three, minimizing wasted time and maximizing your drop chances.

Strategy 1: Andariel Farming (Most Reliable)

Start by farming Greater Lair Keys-this is the foundation of efficient Andariel runs. Keys drop from high-level enemies, Nightmare Dungeons, and Helltide events, so integrate key farming into your daily routine. Focus on activities with high enemy density to speed up key acquisition.

Once you have a stockpile of keys, head to Hanged Man’s Hall in Kehjistan. Clear the Greater Lair quickly, focusing only on Andariel (skip unnecessary mobs to save time). After defeating her, open the boss chest and reset the instance to repeat the run. This loop is the most direct way to target the Scepter.

Strategy 2: Helltide and Nightmare Dungeon Hybrid

Combine Helltide events with Nightmare Dungeons for a balanced farming approach. When a Helltide is active, farm Cinders and open chests for 30-40 minutes. When the event ends, switch to Nightmare Dungeons (preferably Tier 40+) to continue farming loot and Greater Lair Keys.

This hybrid strategy keeps your farming varied while maintaining high loot potential. It also ensures you’re not relying on a single source, reducing frustration if Andariel doesn’t drop the Scepter right away.

Strategy 3: Party Farming for Speed

Farming with a party of 2-4 players significantly speeds up runs. Each player can focus on a specific task: one clears mobs, another collects loot, and another targets elites. This reduces run time for Andariel lairs and Nightmare Dungeons, allowing you to complete more runs per hour.

Additionally, party play increases the number of loot drops, as each enemy killed has a chance to drop items for all players. This means more opportunities to find the Scepter, even if it doesn’t drop directly for you.

Tips to Maximize Drop Chances

Even with the right strategies, the Scepter of the Three’s rarity means you’ll need every edge to boost your odds. Here are key tips to improve your drop rate:

First, maximize your Magic Find (MF) stat. Equip gear with MF affixes, use Elixirs of Fortune, and complete Seasonal Objectives that grant temporary MF bonuses. Every bit of MF increases your chance of rare and unique drops.

Second, focus on high-difficulty content. The Scepter of the Three is an endgame item, so it won’t drop in low-difficulty areas. Stick to World Tier 4, Tier 40+ Nightmare Dungeons, and Greater Lairs to ensure you’re in the right loot pool.

Third, be mindful of bugged interactions. Some players have reported issues with the Scepter’s +15 ultimate ranks not applying to Command Laalish when paired with Rictus of Terror. While this doesn’t affect the Scepter’s drop rate, it’s good to be aware of potential build limitations until the bug is fixed.

Finally, stay consistent. Rare unique items take time to farm-don’t get discouraged if you don’t get the Scepter on your first few runs. Stick to your strategy, and the drop will come with patience.

Final Thoughts

The Scepter of the Three is more than just a weapon-it’s a game-changer for Warlock players looking to push their builds to the next level. Its unique effects redefine ultimate skill gameplay, making it a must-have for endgame content and high-level challenges.

By focusing on Andariel in Hanged Man’s Hall, leveraging Helltide events and Nightmare Dungeons, and following the strategies outlined here, you’ll streamline your farming journey. Remember to maximize your Magic Find, farm in a party for speed, and stay consistent-your efforts will be rewarded when the Scepter of the Three finally drops. In addition, you can quickly obtain more resources by purchasing cheap Diablo 4 Gold or materials.

With this guide in hand, you’re ready to hunt down one of Diablo 4’s most powerful unique weapons. May your runs be efficient, your loot be legendary, and your ultimates be unstoppable.

FC 26 89+ Icon Player Pick Guide: Is the New SBC Worth It?

EA Sports has dropped a brand-new 89+ Icon Player Pick SBC in FC 26, and it has immediately become one of the most talked-about repeatable upgrades of Team of the Season. This latest Icon Pick allows players to choose one of three Icons rated 89 or higher, and for the first time, Trophy Titan Icons have officially been added to the reward pool. If you want to make the most of this SBC without grinding for hours, you can buy FUT 26 Coins to afford multiple attempts. That alone makes this SBC far more exciting than previous Icon packs and picks. Trophy Titans remain some of the most desirable Icon cards in Ultimate Team, offering elite stats, premium PlayStyle+ combinations, and in some cases, endgame-level performance. However, there is a twist. While Trophy Titans are intended to be included, Champion Icon cards have also been appearing in picks, despite not being listed in the official SBC description. This appears to be an unintended error on EA’s part, and players who receive one of these unintended Champion Icons will likely be eligible for compensation.

How the 89+ Icon Player Pick Works

· Choose 1 of 3 Icon players

· All options are rated 89 or higher

· Includes Trophy Titan Icons

· SBC can currently be completed up to three times

· Champion Icons are appearing accidentally and may trigger compensation

This repeatable format gives players multiple chances to hit one of the elite cards currently in circulation.

Best Pulls Available

The addition of Trophy Titans has dramatically improved the ceiling of this SBC. Some of the best possible pulls include:

· Foot Birthday Zlatan Ibrahimovic – still one of the rarest and most expensive cards available, valued at around 4 million coins.

· Foot Birthday Ferenc Puskas – an elite attacking option with incredible finishing and dribbling.

· Trophy Titan Wayne Rooney – a versatile striker with excellent PlayStyles and top-tier all-around stats.

· Trophy Titan Paolo Maldini – one of the best center-backs in the game, especially with future Evolution potential.

· Trophy Titan Ruud Gullit – if you can find him, you’ve basically won the lottery.

· Trophy Titan Ronaldinho – another ultra-rare, game-changing pull.

These are the cards that can instantly transform a squad and provide tremendous long-term value.

Most Common High-Value Pulls

While the absolute elite cards remain rare, several excellent options are appearing at a healthy rate:

· Petr Cech (Trophy Titan) – still a very strong goalkeeper, though no longer the absolute best in his position.

· Alessandro Nesta (94 Trophy Titan) – an underrated center-back with elite defensive presence.

· Marcel Desailly (93) – highly reliable and still very competitive.

· Paolo Maldini (89) – especially valuable as a future Evolution candidate.

· Marcelo (Trophy Titan) – highly sought after for Evolution paths.

· Wayne Rooney – remains a premium attacking option.

Cards That Are Showing Up Frequently

Not every pick will be a winner. Several cards have appeared repeatedly, making them among the more common outcomes:

· Javier Zanetti n- Ian Rush

· Fernando Hierro

· Sol Campbell

· Frank Rijkaard

· Alan Shearer

· John Barnes

· Bobby Moore

· Gennaro Gattuso

These cards are generally best used as high-rated fodder unless they fit a specific squad or Evolution plan.

Champion Icons and Compensation Explained

One of the biggest talking points surrounding this SBC is the accidental inclusion of Champion Icon cards. These cards are not listed in the SBC description, which strongly suggests they were added unintentionally. If you receive a Champion Icon from this player pick, there is a very high chance that EA will issue compensation. Historically, this compensation usually comes in one of two forms:

· A replacement Icon Player Pick

· The return of the fodder used to complete the affected SBC

Importantly, you do not need to select the Champion Icon to qualify for compensation. Simply having the unintended card appear in your pick should be enough.

Is the SBC Worth Completing?

For most players, the answer is yes. Compared to recent Icon Packs, this SBC offers significantly better value because:

· You get three choices instead of one random player

· Trophy Titan cards are included

· Rare Foot Birthday Icons are appearing

· Compensation is possible if you encounter unintended Champion Icons

· The overall quality of pulls appears much stronger than recent Icon Packs

Even when the pick does not deliver a top-tier superstar, the floor is still relatively solid thanks to the guaranteed 89+ rating and the high likelihood of receiving usable fodder.

Best Strategy Before Opening

To maximize your value:

1. Complete all three available picks if your club can support it.

2. Avoid submitting tradable high-value cards unless necessary.

3. Check whether you already own common Icons before choosing.

4. Consider Evolution potential for cards like Maldini and Marcelo.

5. If a Champion Icon appears, take a screenshot for potential compensation tracking.

Final Verdict

The 89+ Icon Player Pick SBC is one of the best upgrade SBCs released during FC 26 Team of the Season so far. The inclusion of Trophy Titans has raised the overall quality dramatically, and the possibility of packing rare cards like Zlatan Ibrahimovic, Puskas, Rooney, Maldini, or Ronaldinho makes it incredibly appealing. To make the most of this SBC without depleting your club, you can buy cheap EAFC 26 Coins from MMOEXP to fuel additional completions. Yes, there are still plenty of fodder outcomes, and cards like Zanetti, Ian Rush, and Shearer appear more often than most players would like. But compared to the disastrous Icon Packs released previously, this Player Pick is a massive improvement. If you have the fodder, this SBC is absolutely worth completing—especially all three attempts. Just be prepared for the occasional duplicate, and keep an eye out for any Champion Icons that could earn you additional compensation from EA. For players chasing an elite Icon upgrade, this is currently one of the best opportunities available in FC 26 Ultimate Team.

ARC Raiders Riven Tides Update Explained: New Beach Map, Giant ARC Threat, and What It Means for Progression

The Riven Tides update marks one of the biggest content expansions in ARC Raiders so far, introducing a brand-new coastal battlefield, powerful ARC enemies, and a wide range of progression systems that reshape how players approach raids. With fresh exploration opportunities and high-risk zones packed with loot, this update significantly changes the game’s core loop.

For players focused on efficiency, survival, and collecting valuable ARC Raiders Items, understanding this update is essential. It also introduces new reasons to optimize gear, upgrade builds, and even consider how to buy ARC Raiders Blueprints to stay competitive in higher-tier content.

What Is the Riven Tides Update?

The Riven Tides update is a major content drop that expands the ARC Raiders universe with a new coastal region located on the western edge of the Rust Belt. This area combines abandoned luxury resorts, industrial dockyards, and open shoreline terrain into a single massive map designed for dynamic encounters.

According to official update details, this is the most ambitious map expansion yet, featuring a mix of environmental storytelling and high-intensity combat zones.

The update introduces:

·A new beach-themed map

·A massive new ARC enemy threat

·New environmental loot mechanics

·Limited-time event systems

·Expanded exploration zones and landmarks

The New Beach Map: Riven Tides

At the heart of the update is the Riven Tides map itself, a coastal region that has been abandoned twice, first during the Exodus, and again after failed attempts to hold the shoreline against ARC forces.

The environment blends multiple gameplay spaces:

·Open beaches for long-range engagements

·Industrial port structures with vertical traversal

·Abandoned resorts and hotels filled with loot

·Dense shoreline areas with hidden resources

Key locations include the Panorama Azzurro hotel, coastal dockyards, and industrial zones that encourage both PvP encounters and PvE farming routes.

This mix of environments makes Riven Tides one of the most flexible maps for farming ARC Raiders Items, especially for players who know how to route efficiently between hotspots.

The Giant ARC Threat: A New Type of Danger

One of the most significant additions in the Riven Tides update is a massive new ARC enemy that patrols the map. This unit behaves differently from traditional ground-based threats and introduces a new layer of strategic gameplay.

Unlike smaller ARC units, this giant threat:

·Dominates open areas of the map

·Forces players to rethink positioning

·Encourages avoidance or coordinated engagement

·Changes how extraction routes are planned

The presence of this enemy makes resource farming more dangerous but also more rewarding. Players who survive encounters or loot nearby zones can secure high-value ARC Raiders Items, making risk management more important than ever.

New Loot Mechanics and Exploration Systems

Riven Tides also introduces new exploration mechanics that change how players gather resources. One of the most notable additions is a beach-based loot system that encourages scavenging along the shoreline.

Players can now:

·Search sand-covered areas for buried loot

·Explore abandoned structures for hidden caches

·Use environmental tools to locate rare resources

·Participate in event-driven resource farming

This system significantly increases the value of exploration-focused runs. Instead of relying purely on combat, players can now build efficient farming routes that combine stealth, movement, and loot discovery.

Why ARC Raiders Items Matter More Than Ever

With the expansion of map size and enemy difficulty, ARC Raiders’ items have become more important to progression than ever before.

Gear quality directly impacts:

·Survival rates in high-risk zones

·Efficiency in farming runs

·Success against elite ARC enemies

·Extraction reliability

Because Riven Tides introduces more unpredictable encounters, players who maintain strong loadouts will consistently outperform those relying on basic equipment.

This creates a stronger progression loop where farming, crafting, and upgrading all matter equally.

Blueprints and Progression Efficiency

As the game continues to expand, crafting becomes a core part of long-term success. Blueprints allow players to build advanced weapons and gear that dramatically improve performance in both PvE and PvP scenarios.

This is why many players actively seek ways to optimize progression through crafting systems or choose to buy ARC Raiders Blueprints to accelerate their build development.

Better blueprints mean:

·Faster enemy elimination

·Safer extraction routes

·Higher success in contested zones

·Improved farming efficiency for rare items

In a high-risk environment like Riven Tides, optimized gear is often the difference between a successful run and a complete loss.

How Riven Tides Changes the Meta

The introduction of this update shifts the ARC Raiders meta in several key ways:

·Exploration is now as important as combat

·Open-field movement carries a higher risk due to giant ARC threats

·Loot routes are more dynamic and less predictable

·High-tier items are more heavily contested

Players can no longer rely on static farming strategies. Instead, adaptability and map awareness are now essential skills for consistent progression.

Final Thoughts

The Riven Tides update is a major turning point for ARC Raiders. With a massive new beach map, a powerful ARC threat, and expanded loot systems, it significantly deepens both the gameplay and progression structure.

MLB The Show 26: Pitching Attributes Explained in Detail

In MLB The Show 26, pitching is the backbone of winning games, no matter which mode you prefer—Diamond Dynasty, Franchise, or online play. While big hits and home runs often steal the spotlight, consistent success usually comes from controlling the mound. Understanding how pitching attributes work gives you a clear advantage, helping you shut down opponents and dictate the flow of every matchup.

Each pitcher comes with a unique set of attributes that directly impact how their pitches perform. These ratings influence everything from speed and accuracy to deception and endurance. Learning how they interact is key to building a dominant rotation and bullpen.

Focusing on pitching stats isn’t just for hardcore players—it benefits everyone. High-quality pitching allows you to rack up strikeouts, limit scoring opportunities, and stay competitive in tougher matchups. In modes like Diamond Dynasty, strong pitchers also make challenges easier and help you earn rewards more efficiently. Ultimately, mastering these attributes lets you get the most out of every arm on your roster.

Core Pitching Attributes

Velocity

Velocity determines how fast the ball travels toward the plate. The higher the rating, the less time hitters have to react. Fastballs benefit the most from this stat, making them especially effective for overpowering batters.

However, raw speed alone isn’t enough. A pitcher who throws hard but lacks precision can easily give up walks or hittable pitches. The best results come from balancing velocity with control.

Control

Control reflects how accurately a pitcher can place the ball. This attribute is essential for consistently hitting your intended spots, whether you’re painting the corners or baiting hitters outside the zone.

Pitchers with strong control are far more reliable. They reduce free passes, execute pitch sequences more effectively, and can exploit weaknesses in a batter’s approach. If you prefer a tactical style of pitching, this stat is crucial.

Break (Movement)

Break, or movement, measures how much a pitch deviates from a straight path. This includes both horizontal and vertical motion.

Pitches with high movement are much harder to square up. Sliders that dart across the plate, curveballs that drop sharply, and changeups that fade away can all disrupt timing and contact. When paired with good velocity, movement becomes even more dangerous.

Stamina

Stamina determines how long a pitcher can maintain peak performance. As stamina drains, velocity drops and control becomes less reliable.

This attribute is especially important for starting pitchers, who need to last multiple innings. Managing stamina wisely helps you avoid late-game collapses and reduces the need to overuse your bullpen. In longer modes like Franchise, it becomes a critical factor in overall team management.Upgrade your lineup instantly with MMOexp—your trusted source for MLB The Show 26 Stubs at competitive prices.

Pitch Arsenal

A pitcher’s arsenal refers to the variety of pitches they can throw. Common options include fastballs, sliders, curveballs, and changeups.

Pitchers with a wider selection are more unpredictable. They can adjust to different hitters, mix speeds effectively, and keep opponents guessing. A limited arsenal, on the other hand, makes it easier for hitters to anticipate what’s coming.

Pitch-Type Effectiveness

Beyond general attributes, each pitch type has its own effectiveness rating. These determine how well specific pitches perform in terms of speed, movement, and accuracy.

Fastballs rely heavily on velocity and command
Breaking pitches depend on movement and deception
Off-speed pitches are all about disrupting timing

A pitcher with strong ratings across multiple pitch types can create more effective combinations, making them far harder to read.

Clutch and Confidence

Mental attributes also play a role in pitching performance.

Clutch affects how well a pitcher performs in high-pressure moments, such as late innings or when runners are on base.

Confidence impacts overall consistency. A confident pitcher is more likely to hit their spots and maintain pitch quality.

These attributes often determine whether a pitcher thrives or struggles in critical situations.

How to Use Pitching Attributes Effectively

Understanding the stats is only half the battle—you also need to apply them strategically.

Play to matchups: Choose pitchers whose strengths counter the opposing lineup. For example, use high-velocity arms against aggressive hitters or high-control pitchers against patient ones.

Manage your rotation: Keep an eye on stamina and avoid overworking your starters. Fresh pitchers perform better and give you a higher chance of success.

Mix your pitches: Repetition is your enemy. Vary speed, location, and pitch type to keep hitters off balance and prevent them from timing you.

Pitching in MLB The Show 26 is as much about strategy as it is about skill. Attributes like velocity, control, movement, and stamina all contribute to how a pitcher performs, while pitch variety and mental stats add another layer of depth.Skip the grind and play your way—MMOexp makes it easy to secure buy MLB The Show 26 Stubs quickly and safely.

By learning how these elements work together, you can build a more effective pitching staff and gain a real edge over your opponents—whether you’re playing casually or aiming for competitive dominance.

ARC Raiders Workshop & Blueprints Guide

In ARC Raiders, survival in the chaotic battlefields of Speranza depends heavily on your ability to craft, upgrade, and optimize gear. Your Workshop serves as the central hub for all crafting activities, while ARC Raiders BluePrints unlock the recipes needed to create powerful weapons, essential utilities, and protective gear. This guide breaks down everything you need to know to master the Workshop, farm Blueprints efficiently, and gain a competitive edge in every raid.

Understanding the Workshop: Your Crafting Hub

The Workshop is more than just a crafting station-it’s your base of operations for turning scavenged materials into usable gear. When you first start the game, you’ll have access to a basic Workbench, but upgrading specialized stations is key to unlocking advanced crafting options.

There are seven core stations in the Workshop, each with a unique purpose. From crafting weapons to refining materials, every station plays a vital role in your progression. Unlike vendors in Speranza, which charge exorbitant prices for even basic supplies, the Workshop lets you create what you need using materials collected during raids-making it your lifeline in the game.

Additionally, you have a loyal companion named Scrappy, a rooster that collects basic materials for you every time you go on a raid. Upgrading Scrappy increases the amount of materials it brings back, saving you valuable farming time and ensuring you never run out of essentials.

Workshop Stations: Breakdown and Upgrade Tips

Each Workshop station can be upgraded from Level 0 to Level 3, with higher levels unlocking better recipes and more powerful gear. Below is a breakdown of the key stations and their upgrade requirements to help you prioritize your progression.

1. Gunsmith

The Gunsmith is essential for crafting and modifying weapons. It unlocks access to uncommon, rare, and epic guns, as well as weapon mods that enhance damage, accuracy, and utility. Upgrading it is a top priority for players who want to dominate in combat.

Level 1 requires 20 Metal Parts and 20 Rubber Parts. Level 2 needs 3 Rusted Tools, 5 Mechanical Components, and 8 Wasp Drivers. For Level 3, you’ll need 3 Rusted Gears, 5 Advanced Mechanical Components, and 4 Sentinel Firing Cores.

2. Gear Bench

The Gear Bench focuses on crafting armor, shields, and augments (backpacks) that boost your survival. Shields are critical for withstanding enemy attacks, while augments increase your carrying capacity and gear efficiency.

To upgrade to Level 1, you need 25 Plastic Parts and 30 Fabric. Level 2 requires 3 Power Cables, 5 Electrical Components, and 3 Hornet Drivers. Level 3 demands 5 Industrial Batteries, 3 Advanced Electrical Components, and 3 Rollbot Parts.

3. Other Key Stations

The Medical Lab crafts healing items like bandages and shield rechargers-essential for staying alive during raids. The Explosives Station creates grenades and mines, powerful tools for taking down groups of enemies or ARC units. The Utility Station makes gadgets like raider hatch keys, while the Refiner processes raw materials into advanced components needed for high-tier crafting.

Blueprints: Unlocking New Recipes

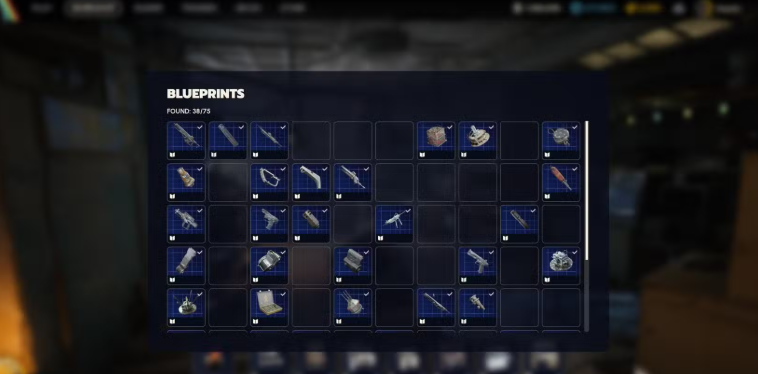
Blueprints are the foundation of advanced crafting in ARC Raiders. They are recipes that unlock new weapons, mods, and gear, and you must learn a Blueprint before you can use it in the Workshop. There are 75 Blueprints in total, covering everything from basic utilities to rare weapons like the Dolabra shotgun.

Without Blueprints, even the most upgraded Workshop stations will be limited to basic recipes. Some Blueprints are common, while others are rare and can only be obtained through specific events or high-risk raids.

How to Farm Blueprints Efficiently

Blueprints can be found in various ways, but some methods are more efficient than others. Here are the best strategies to farm Blueprints quickly:

1. Loot High-Value Containers

Focus on looting raider containers, security lockers, and ARC assessor dropships. These containers have a higher drop rate for Blueprints compared to standard loot bags. ARC assessor dropships, which appear during the “Close Scrutiny” map condition, are particularly valuable for rare Blueprints like the Dolabra.

2. Complete Quests and Events

Many quests and world events reward Blueprints upon completion. The Harvester event, for example, is the only source of rare Blueprints like Jupiter and Equalizer. Participating in night raids or electromagnetic storms also doubles Blueprint drop rates, making these times ideal for farming.

3. Follow the Dam Battlegrounds Route

The Dam Battlegrounds map has an optimized route for Blueprint farming. Depending on your spawn point, stick to the map’s edge to collect as many caches as possible. With a bit of luck, you can extract with 5+ Blueprints in a single run.

Using Blueprints and Recycling Materials

Once you’ve collected a Blueprint, you must safely extract from the raid to add it to your inventory. From there, you can choose to learn it (unlocking the recipe), sell it for coins, or trade it with other players.

Remember that some Blueprints require specific Workshop station levels to use. For example, crafting the Dolabra shotgun requires the Gunsmith to be Level 3, along with rare materials like Shredder Gyros and Magnetic Accelerators.

If you’re short on materials, use the Refiner to recycle high-tier items into lower-rarity components. This ensures no loot goes to waste-for example, a rare Speaker Component can be recycled into 2 Plastic Parts and 3 Rubber Parts.

Pro Tips for Mastering Workshop and Blueprints

Tag target materials before launching a raid-this highlights them on your map and cuts farming time by 40-50%. Prioritize upgrading Scrappy early to increase your material income. Focus on one or two stations first (like the Gunsmith or Gear Bench) to unlock key gear before moving to others.

Don’t hoard Blueprints-learn the ones that align with your playstyle (e.g., explosives for aggressive players, healing items for support) and sell or trade duplicates. Finally, always extract safely-all the Blueprints and cheap ARC Raiders Materials you collect are lost if you die before escaping.

By mastering your Workshop and efficiently farming Blueprints, you’ll turn scavenged materials into a powerful arsenal. Whether you’re crafting a deadly shotgun, a sturdy shield, or essential healing items, these tools will help you survive and thrive in the harsh world of ARC Raiders.

ARC Raiders:Step-by-Step Guide to Week 18 Trials

With the return of Weekly Trials following a brief Expedition Window, players in ARC Raiders are once again presented with the chance to accumulate stars and unlock seasonal rewards. This guide outlines everything you need to know to efficiently tackle the Week 18 Trials, covering each objective, ideal maps, and strategies to score three stars quickly.

Each challenge can be completed separately, so effective planning regarding routes and map selection will enhance your success.

Trial 1:Damage Leapers

Leapers are known for being aggressive foes in ARC Raiders, particularly when encountered in open spaces. However, with the right tactics and weaponry, they can be defeated with ease.

Recommended Map

Launch Towers (Spaceport Map):This location is rich in ARC activity and offers ample cover.

Strategy Tips

Utilize heavy weapons for reliable mid-range damage.

Stay partially covered until you’re ready to engage.

Target the center core for maximum damage.

Avoid open areas unless all nearby threats are neutralized.

For three stars, you need to eliminate two Leapers during a significant map event. Queuing during intense conditions can expedite this completion.

Trial 2:Loot Bird’s Nests

This trial requires playing under the Bird City condition on a specific map.

Essential Map

Buried City:Ensure the Bird City condition is active by rotating matches if necessary.

Looting Guide

Upon spawning, move to rooftops.

Check chimneys for bird nests.

Interact with the nests to loot them; they contribute to your trial progression and often contain valuable items.Don’t let your loadout hold you back—buy ARC Raiders Items now and stay ahead of the competition.

Pro Tips

Equip mobility gear to facilitate rooftop navigation.

Clear the area of enemies before climbing to avoid exposure.

Consider pairing this objective with probe hunting if applicable.

Trial 3:Damage Spotters

Spotters are aerial drones that assist Bombardiers by marking players. While they themselves inflict no damage, being marked can lead to hazardous situations.

Where to Find Spotters

These drones can appear on any map except Stella Montis.

Strategy for Efficient Completion

Use a sniper or a precise mid-range rifle.

Maintain partial cover while aiming upward.

Target Spotters before they can alert Bombardiers.

Clearing the skies promptly will help you secure three stars easily.

Trial 4:Open ARC Probes

This trial is considered one of the simpler tasks for Week 18.

Where to Locate Probes

Probes can spawn on any map, but the fastest method involves:

Watching for the Prospecting Probes event.

Listening for the unique pinging sound.

Safe Breaching Tips

Clear any enemies nearby before interacting with the probes.

Remain aware of your surroundings, as probes can attract combat.

Focus on breaching and gathering rewards swiftly. Repeat as needed for three stars.

Consider combining probe hunting with Spotter damage for efficiency.

Trial 5:Search Containers in the Medical Research Wing

This trial exclusively requires players to be on the Stella Montis map.

Location Guide

Navigate to the western portion of Stella Montis.

Search and loot containers within the Medical Research Wing.

To achieve three stars, you must successfully loot enough containers and extract safely. Prioritize extraction to avoid unnecessary delays.

Preparations

Before entering, ensure your gear and crafting setups are optimized. Stronger equipment and advanced weapon builds can significantly boost your chances during extraction missions.

Efficient Completion Strategy for All Trials

To maximize your time and effort:

1.Begin with runs in Spaceport or Buried City.

2.Concentrate on completing objectives related to Leapers, Spotters, and Probes.

3.Wrap up with a focused Night Raid in Stella Montis to fulfill the Medical Wing challenge.

By stacking compatible objectives within a single deployment, you can greatly minimize grind time while acquiring valuable items for long-term progression.

The Week 18 Trials in ARC Raiders offer a balanced mix of exploration and combat. With strategic map selections and careful positioning, players can efficiently earn three stars across all objectives in just a few concentrated runs.Unlock your full potential in ARC Raiders with premium ARC Raiders BluePrints for sale delivered fast and securely from MMOexp.

OSRS Twisted Buckler Guide: How to Get One of the Best Ranged Shields

In Old School RuneScape (OSRS), optimizing your combat gear is essential for tackling high-level PvM content efficiently. Among the most powerful off-hand items for ranged combat is the Twisted Buckler, a highly sought-after shield known for its exceptional ranged attack bonus and solid defensive stats. Players who specialize in ranged combat often consider the Twisted Buckler a core upgrade for endgame activities.

Whether you’re farming raids, fighting bosses, or preparing for advanced PvM encounters, understanding how to obtain the Twisted Buckler can help you progress faster. In this guide, we’ll break down what makes the Twisted Buckler so valuable, how to obtain it through gameplay, and how many players use OSRS gold to purchase it directly.

What Is the Twisted Buckler?

The Twisted Buckler is a high-tier ranged shield introduced with the Chambers of Xeric, the first raid in Old School RuneScape. Unlike most shields that prioritize defensive bonuses, the Twisted Buckler focuses heavily on improving ranged accuracy while still offering respectable defensive stats.

Requirements to Equip the Twisted Buckler

To wield this powerful shield, players must have:

·75 Ranged

·75 Defence

These requirements place the item firmly in the mid-to-late game progression stage, making it a natural upgrade for players entering advanced PvM content.

The Twisted Buckler provides one of the highest Ranged attack bonuses among all shields in OSRS. Because accuracy plays a major role in damage output, especially against bosses with high defense, this shield is extremely valuable for maximizing DPS.

It pairs particularly well with powerful ranged weapons such as:

·Twisted Bow

·Dragon Hunter Crossbow

·Armadyl Crossbow

Method 1: Obtain the Twisted Buckler from Chambers of Xeric

The primary way to obtain the Twisted Buckler is by completing the Chambers of Xeric raid. This raid is located in Great Kourend at Mount Quidamortem, and it features a series of combat rooms, puzzles, and boss encounters that culminate in a final battle.

Access Requirements

Unlike some other raid content, the Chambers of Xeric does not require specific quests to enter. However, players are strongly encouraged to have high combat stats and strong gear before attempting it.

Recommended requirements include:

·90+ Combat level

·High combat stats in ranged, magic, and melee

·Experience with PvM mechanics

·Reliable food and potions

Raids can be completed either solo or with a team. Most players prefer team raids because they are faster and more forgiving for newer raiders.

How the Chambers of Xeric Drop System Works

The Chambers of Xeric uses a points-based reward system. Each player earns points during the raid based on their performance and contributions.

Factors that influence your drop chances include:

·Total raid points earned

·Individual player contribution

·Team size

·Death count during the raid

At the end of the raid, rewards are generated in a chest. Occasionally, players receive a rare reward known as a “purple chest.” This indicates that a unique raid item has been rolled.

Possible unique drops include:

·Twisted Bow

·Dragon Claws

·Kodai Insignia

·Ancestral armor pieces

·Twisted Buckler

Even if you receive a purple chest, the item you obtain is randomly selected from the raid’s unique drop table. Because of this, getting a Twisted Buckler can take many raids depending on luck.

Tips for Farming the Twisted Buckler Efficiently

If you plan to grind Chambers of Xeric in hopes of receiving the buckler, there are several strategies that can improve your chances.

Join Experienced Teams

Experienced raiding groups tend to complete raids much faster, allowing you to accumulate points and rewards more efficiently.

Avoid Dying During Raids

Deaths significantly reduce your raid points, which lowers your chances of receiving rare rewards.

Focus on High Damage Output

The more damage you contribute during encounters, the higher your personal raid points will be.

Learn Solo Raids (Advanced Option)

Solo raids can be more challenging but offer complete control over raid points. Skilled players sometimes prefer this method for maximizing their drop chances.

Even if you don’t obtain the Twisted Buckler immediately, Chambers of Xeric remains highly profitable. Regular raid rewards can generate substantial amounts of OSRS gold over time.

 Method 2: Buy the Twisted Buckler from the Grand Exchange

For players who prefer a faster route, the Twisted Buckler can also be purchased directly from the Grand Exchange. Since it is a tradeable raid item, many players sell their drops on the market.

However, the shield can be expensive due to its usefulness in endgame PvM.

To afford it, players typically earn OSRS gold through activities such as:

·Boss farming (Vorkath, Zulrah, Hydra)

·High-level Slayer tasks

·Raids

·Grand Exchange flipping

·Skilling for profit

Some players also explore online marketplaces where OSRS items for sale are available. These services can allow players to quickly obtain powerful gear upgrades and save time on long grinding sessions. As always, players should prioritize account safety and remain aware of game policies before considering such options.

Purchasing the Twisted Buckler directly is often the fastest way to incorporate it into your ranged setup.

Why the Twisted Buckler Is So Valuable

The Twisted Buckler stands out because it provides a rare combination of offensive and defensive power for ranged builds.

High-Ranged Accuracy

Its ranged attack bonus significantly increases hit consistency, which directly improves DPS in long boss fights.

Strong Defensive Stats

Unlike many offensive items, the buckler still provides respectable defense against melee, ranged, and magic attacks.

Ideal for Endgame PvM

The Twisted Buckler is frequently used in high-level content, such as:

·Chambers of Xeric

·Theatre of Blood

·Vorkath

·Alchemical Hydra

·High-level Slayer encounters

Compared to other shields like the Odium Ward or Dragonfire Ward, the Twisted Buckler often performs better in situations where maximizing ranged damage is the priority.

Final Thoughts

The Twisted Buckler remains one of the best ranged shields available in Old School RuneScape. With its exceptional ranged attack bonus and balanced defensive stats, it is a staple item for players engaging in endgame PvM.

You can obtain the Twisted Buckler either by completing the Chambers of Xeric and hoping for a rare drop or by purchasing it directly from the Grand Exchange using accumulated OSRS gold. Some players also explore marketplaces offering OSRS items for sale to accelerate their gear progression.

Regardless of the path you choose, the Twisted Buckler is a powerful upgrade that can significantly improve your ranged performance in some of the toughest challenges across Gielinor.

Black Ops 7 Zombies:Best Guns and Loadout Strategy for Cursed Ashes

Ashes of the Damned is one of the most intense and mechanically demanding Zombies experiences in Call of Duty:Black Ops 7. Whether you’re attempting the full Easter egg, preparing for the brutal final boss fight, or simply trying to survive higher rounds consistently, your loadout matters more here than on almost any other map.

Best Weapon for Ashes of the Damned

Our primary weapon recommendation is the M15 MOD 0, the first Assault Rifle unlocked in BO7. It’s beginner-friendly, scales extremely well into late rounds, and-most importantly-has access to a critical attachment needed for the boss fight.

Why the M15 MOD 0 Is the Best Choice

The standout attachment here is the M335-X Cloak Underbarrel, which allows you to fire smoke grenades. These smokes are essential during the boss fight when repairing Ol’ Tessie, as they cloak you from zombies and give you the breathing room needed to survive inevitable explosions.

Best Attachments Explained

Monolith Suppressor (Muzzle):Grants extra salvage on kills and boosts bullet velocity and damage range

16.5” Fusion Barrel:Further improves damage range and bullet velocity

M335-X Cloak (Underbarrel):Fires smoke grenades to hide from zombies during repairs

Backline Flip Mags:Faster reloads for constant sustained fire

Hexcut Grip:Improves ADS, slide-to-fire, dive-to-fire, and jump ADS speeds

Telescopic Stock:Boosts movement, strafing, and hipfire mobility

5.56 NATO Overpressured:Increases bullet velocity

Alongside your primary weapon, you should always carry the Necrofluid Gauntlet. It deals massive damage, siphons health, and trivializes most encounters outside the boss arena. During the boss fight, you should only leave Ol’ Tessie when it explodes-and even then, only briefly.

Best GobbleGums for Ashes of the Damned

GobbleGums aren’t mandatory, but they can dramatically reduce difficulty and save failed runs.

Recommended GobbleGums:

Perkaholic:Instantly grants all perks

Near Death Experience:Revive by proximity; revived players keep perks

Power Keg:Activates a Full Power power-up

Shields Up:Fully refills armor and doubles armor strength

Gift Card:Grants 30,000 Essence

Gift Card is best used on Round 1, allowing you to open all doors, buy early Pack-a-Punch tiers, and rush Easter egg steps before zombie scaling becomes punishing.

For the boss fight:

Solo:Power Keg, Shields Up, Perkaholic

Co-op:Power Keg, Shields Up, Near Death Experience

Best Perks and Augments for Ashes of the Damned

While every perk has value, these five are essential for both the Easter egg and boss fight:

Jugger-Nog – Increased health

Quick Revive – Faster healing and revives

Speed Cola – Faster reloads and armor application

Stamin-Up – Increased movement speed

Melee Macchiato – Boosted melee damage

Best Augments to Use:

Jugger-Nog(Iron Core, Durable Plates):Increases HP when armor breaks and boosts armor durability

Quick Revive(Dying Wish, Karmic Return):Grants temporary invulnerability to lethal damage and full heal on revives

Dying Wish is especially powerful. Even though it consumes Quick Revive, it saves your run by preventing death and keeping all other perks active.

Best Equipment in Ashes of the Damned

Your tactical equipment can make or break boss phases and tight Easter egg steps.

Cymbal Monkey (Best Tactical Choice)

Unlocks at Level 24
Costs 1,000 Salvage
Can carry two at once
Recharges with Max Ammo

Cymbal Monkeys are perfect for distracting zombies while repairing Ol’ Tessie or surviving laser-heavy boss phases. While slower than the Kazimir, their accessibility and recharge synergy make them the best option here.

Lethals and Scorestreaks are mostly irrelevant, though the Combat Axe is required for a side Easter egg (a free one spawns at Reba’s Diner at Exit 115).

Best Field Upgrade and Augments

Aether Shroud (Best Overall Field Upgrade)

Aether Shroud is mandatory for Ashes of the Damned. While active, all enemies-including elites and bosses-ignore you entirely.

Best Augments:

Extra Charge:Grants an additional Aether Shroud charge

Group Shroud (Co-op):Cloaks nearby allies

Burst Dash (Solo):Short-range warp that kills normal enemies

Extension (Extra Slot):Significantly increases Shroud duration

Two Aether Shroud charges during the boss fight can single-handedly secure success.

Ashes of the Damned is unforgiving, but with the right setup, it becomes far more manageable. This loadout is optimized for survivability, boss mechanics, and Easter egg consistency.

Players practicing Zombies mechanics or challenge setups often warm up in CoD Black Ops 7 Bot Lobbies, which can help refine movement, weapon handling, and perk synergy without pressure. Some players even choose to buy Black Ops 7 Bot Lobbies to practice high-level strategies before committing to full Easter egg runs.

Diablo 4 March of the Stalwart Soul Guide: How to Get and Best Paladin Builds

March of the Stalwart Soul is one of the most impactful Unique boots available to the Paladin class in Diablo 4, especially for players who favor speed, aggressive positioning, and constant pressure. Designed specifically to enhance the advanced basic skill, these boots turn mobility into a lethal offensive tool, allowing Paladins to dash through enemies while dealing devastating damage.

For builds that rely on fast clears, hit-and-run tactics, or fluid movement between packs, March of the Stalwart Soul is a defining piece of gear. In this guide, we’ll break down what these Unique boots do, their stats and effects, and the most reliable ways to farm them efficiently in Diablo 4.

What Is March of the Stalwart Soul in Diablo 4?

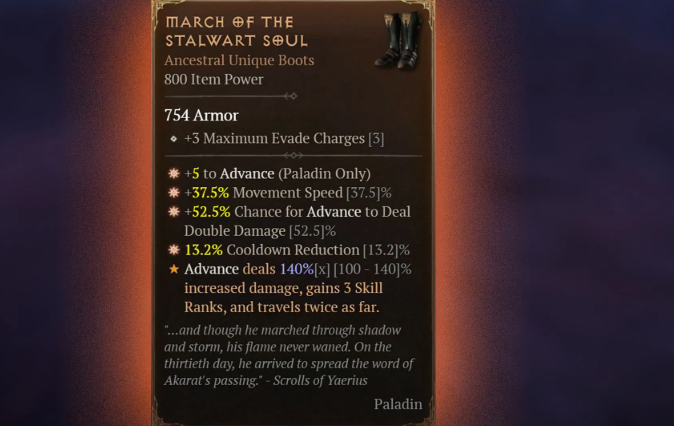
March of the Stalwart Soul is an Ancestral Unique boot exclusive to the Paladin class. Unlike standard movement-focused boots, this item is entirely built around empowering Advance, transforming it from a simple mobility skill into one of the strongest basic-skill damage tools in the Paladin kit.

Advance already offers repositioning and minor damage, but with March of the Stalwart Soul equipped, it becomes a long-range, high-impact attack that excels in both single-target engagements and high-density content. This makes the boots especially valuable for speed-farming, Nightmare Dungeons, and boss rotations.

Stats of March of the Stalwart Soul

March of the Stalwart Soul rolls with a powerful mix of mobility, cooldown reduction, and skill scaling, making it one of the most efficient boots for aggressive Paladin builds.

Base affixes include:

·+3 Maximum Evade Charges

·+(2-3) Ranks to Advance (up to +5 with Masterworking)

·+(16.0-25.0)% Movement Speed (up to 37.5% with Masterworking)

·+(26.0-35.0)% Chance for Advance to Deal Double Damage (up to 52.5% with Masterworking)

·(8.1-8.8)% Cooldown Reduction (up to 13.2% with Masterworking)

These stats significantly reduce downtime between movement and damage windows. Extra Evade charges improve survivability, while movement speed and cooldown reduction ensure near-constant mobility. When combined with other optimized Diablo 4 Items, these boots allow Paladins to maintain pressure without sacrificing safety.

Unique Effect of March of the Stalwart Soul

The defining power of these boots lies in their Unique effect:

“Advance deals 100-140% increased damage, gains 3 Skill Ranks, and travels twice as far.”

This effect completely redefines Advance. The increased travel distance allows Paladins to cut through enemy packs or disengage instantly, while the massive damage multiplier and bonus skill ranks make it a legitimate primary damage source.

When paired with the chance for Advance to deal double damage, Paladins can rapidly clear dense packs while staying highly mobile-an ideal setup for endgame farming and speed-focused builds.

How to Get March of the Stalwart Soul in Diablo 4

March of the Stalwart Soul can drop from multiple sources, but targeted boss farming is by far the most efficient method. Below are the best ways to farm this Unique reliably.

Boss Farming (Best Method)

1) Varshan

·Location: Malignant Burrow Dungeon, eastern Hawezar

·Difficulty: Torment

·Boss Hoard Key: 12× Malignant Hearts

How to Get Malignant Hearts:

·Whisper Caches from Tree of Whispers rewar.ds

·Tortured Gift of Mysteries in Helltides (250 Aberrant Cinders)

·Kurast Undercity using Tribute of Titans

Varshan is one of the most efficient bosses to farm for Paladin Uniques thanks to relatively accessible materials and fast repeat runs.

2) Grigoire

·Location: Hall of the Penitent Dungeon, Dry Steppes

·Difficulty: Torment

·Boss Hoard Key: 12× Living Steel

How to Get Living Steel:

·Tortured Gift of Mysteries in Helltides

·Kurast Undercity using Tribute of Titans

·Asteroth during Escalating Nightmares

Both Varshan and Grigoire are excellent targets for farming March of the Stalwart Soul and other high-value Diablo 4 Items that synergize with mobility-based Paladin builds. Players looking to speed up the process can also buy Diablo 4 materials, such as Malignant Hearts or Living Steel,l to reduce preparation time.

Nightmare Dungeons (Secondary Method)

March of the Stalwart Soul can also drop from:

·Random enemies

·Elite packs

·End-of-dungeon reward chests

Nightmare Dungeons with high monster density are the best option if you want to farm experience, Glyph upgrades, and crafting materials simultaneously. While drop rates are lower than targeted boss farming, this method offers strong overall progression value.

Best Builds for March of the Stalwart Soul

These Unique boots excel in:

·Advance-focused Paladin builds

·Mobility-based melee setups

·Speed-farming and high-density content builds

They pair exceptionally well with cooldown reduction, movement speed stacking, and effects that reward frequent repositioning. When fully optimized, Advance becomes both a primary damage dealer and a near-constant movement tool.

Final Thoughts

March of the Stalwart Soul stands out as one of the most impactful Unique boots for Paladins in Diablo 4. Its powerful stat package, massive Advance damage multiplier, and enhanced mobility make it a top-tier choice for players who value speed, aggression, and fluid combat.

Page 1 of 10

Powered by WordPress & Theme by Anders Norén